spotfire 내맘대로 커스텀하기!!
사실ㅇ은... 는 그냥 있는데로가 제일 이뿌다
1. "TIBCO Spotfire Developer"를 찾아서 다운 해줍니다.
사이트 : TIBCO eDelivery site
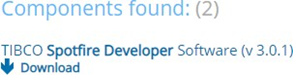
이부분 찾아서 Download 클릭
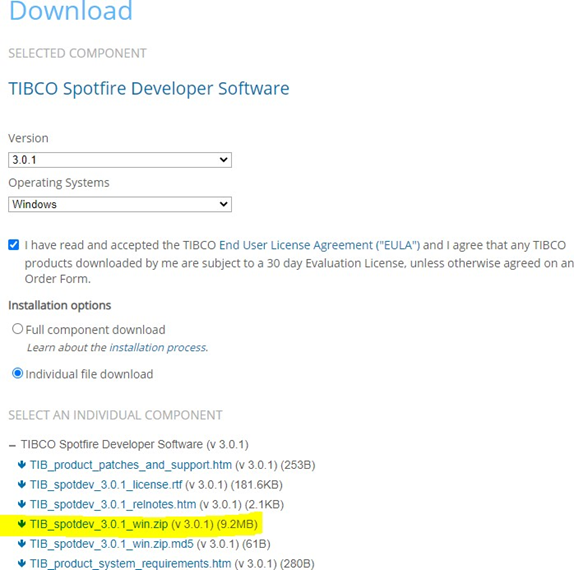
이부분을 찾아서 다운받고 압축 풀기를 해줍니다.
2. cobranding.config 템플릿을 수정해줍니다.
메뉴얼 pdf 파일을 참고하여, cobranding.config 템플릿을 수정해 줍니다
전체 설명서 .pdf
간단하게 설명하면,
이부분을 긁어와 txt에 붙여 넣기 한 후에 cobranding.config으로 저장해 줍니다.
<?xml version="1.0" encoding="utf-8"?>
<cobranding>
<!--
When specifying a URL, the following characters must be escaped:
Character Escape code
_________________________
SPACE %20
< %3C
> %3E
# %23
% %25
{ %7B
} %7D
| %7C
\ %5C
^ %5E
~ %7E
[ %5B
] %5D
` %60
; %3B
/ %2F
? %3F
: %3A
@ %40
= %3D
& %26
$ %24
The only valid schemes to use in the URL are HTTP and HTTPS. If a scheme
is not provided, the scheme is assumed to be HTTP.
To assign an access key to a menu item, the letter intended
to be used as access key must be prefixed with an ampersand (&). This
character also must be XML encoded to &. To display an actual
ampersand in these items, two escaped ampersand characters must be
placed next to each other (&&).
All images used in the cobranding package must be in the PNG format. If
the images are in a different format, the cobranding package uses the
default images in TIBCO Spotfire.
-->
<!--
Replaces product name in window title and login dialog of Spotfire Analyst.
If the product name exceeds the available space in the login dialog, the
product name is trimmed.
-->
<productName>Sample Product Name</productName>
<!--
Replaces product name in window title, login dialog, and About page for the
Web Player. If the product name exceeds the available space in the login
dialog, the product name is trimmed.
-->
<productNameWeb>Sample Product Name</productNameWeb>
<!--
The banner is used in splash screens and the About dialog of Spotfire Analyst.
The banner should be 700 pixels x 57 pixels, and able to be safely cropped to
400 pixels x 57 pixels. The cropping is done on the right side of the image.
Vital image information should be placed on the left side of the image to
ensure that it will not disappear when cropped.
-->
<logoBanner>banner.png</logoBanner>
<!--
Replaces the "TIBCO Spotfire Support" text on the Help menu and the support
link. If the support URL exceeds the available space in the About dialog,
the link is trimmed and the full URL is displayed in a tooltip.
-->
<support>
<text>Sample &Support Link</text>
<url>www.example.com/support</url>
</support>
<!--
Replaces the "TIBCO community" text on the Help menu, and the link to the
TIBCO community.
-->
<community>
<text>TIBCO Community</text>
<url>https://community.tibco.com/products/spotfire/</url>
</community>
<!--
Replaces the "About TIBCO Spotfire" text on the Help menu.
-->
<about>Sample &About Box</about>
<!--
Link in the bottom left of the About dialog.
-->
<companyUrl>www.example.com</companyUrl>
<web>
<!--
The WebHeader.htm file is used to add a custom header to the server UI
and Web Player.
-->
<header>WebHeader.htm</header>
<!--
The logo shown in the navigation header on the library page. If the
image exceeds the dimensions 190x33 pixels, the image will be cropped.
-->
<navigationLogo>libraryNavigationLogo.png</navigationLogo>
</web>
<!--
To override the Spotfire default toolbar configuration without changing
the group preference, supply a json-file that contains a json object with
the name "ToolbarShortcuts" and the value is an array of toolbar identifiers.
-->
<defaultPreferences>defaultPreferences.json</defaultPreferences>
</cobranding>
각각 주석 처리 밑에 변경하고 싶은 것을 수정해 주면 됩니다.
3. 임의로 폴더를 생성하고 수정한 cobranding.config 템플릿을 넣어줍니다.
1번에서 압축 풀었던 파일을 찾아서,
TIB_sfire_dev_10.10.2_win → SDK *Package Builder 폴더에 접속해서,
Spotfire.Dxp.PackageBuilder.exe
파일을 실행해 줍니다.
4. Manage를 클릭하여 만들어줍니다
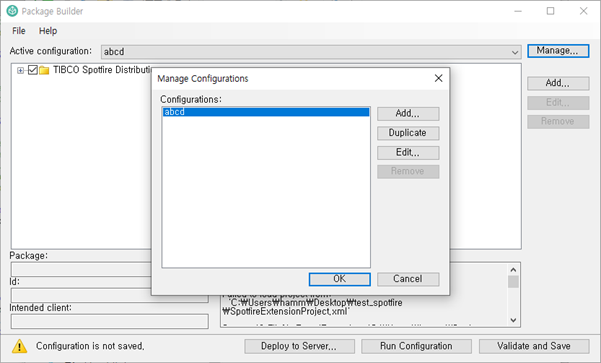
후에 알아보기 쉽게 이름을 지정하여 만들어 줍니다.
5. FIile → Add TIBCO Spotfire Distribution 을 클릭하여 Modules 를 등록해 줍니다.

C://\Program Files (x86)\TIBCO\Spotfire\10.10.2 에 Modules 를 등록해줍니다.
modules 파일이 있는 곳을 찾아 등록해 줍니다.
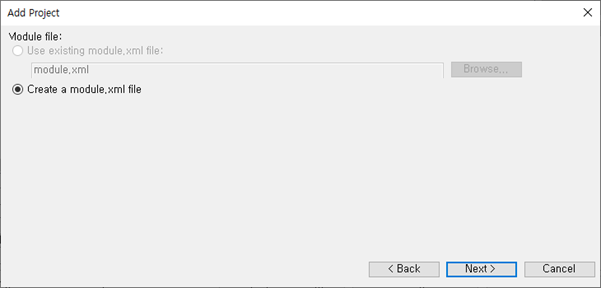
6. Add 를 클릭하여 선택을 해제하고 브라우저를 열어, cobranding.config 템플릿이 있는 폴더를 선택해 줍니다.
❕cobranding.config 이 있는 폴더를 선택해 줍니다
다음을 눌러 module.xml 파일을 생성해 줍니다.
7. conbrangding.config를 선택하여 체크, 클릭 Public resource name에 corbrangding.config라 입력합니다.
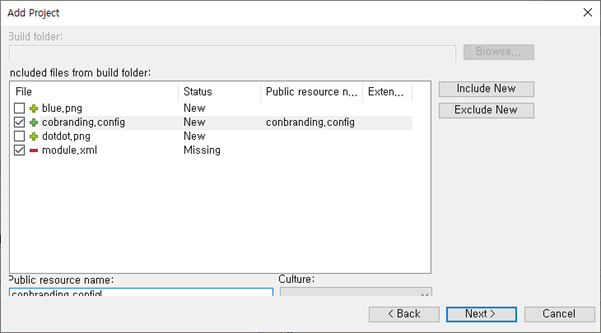
글씨를 입력하는 창이 활성화가 안되면 cobranding.config가 클릭 되어 있는 상태인지 확인해 줍니다.
회색으로 클릭 되어 있어야 Public resource name 활성화됨.
next클릭.
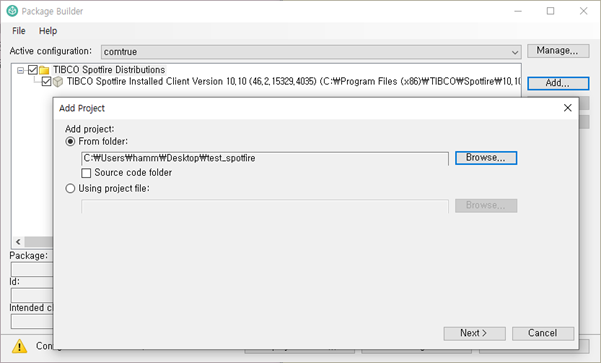
8. 프로젝트 추가해주기
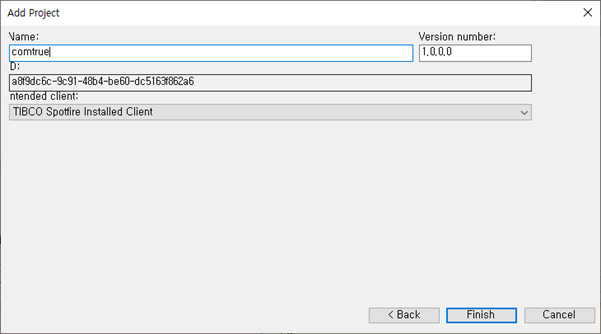
이름을 설정해주고 Finish를 눌러줍니다.
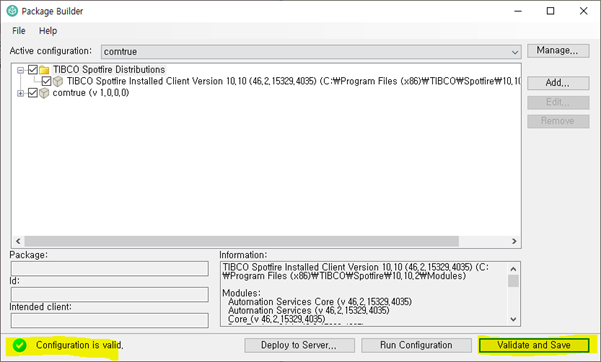
9. 저장 해주기
Validate and Save 클릭하여 Configuration is valid. 가 잘 완료 되었는지 확인해 줍니 다.
10. Builder Package File 해주기
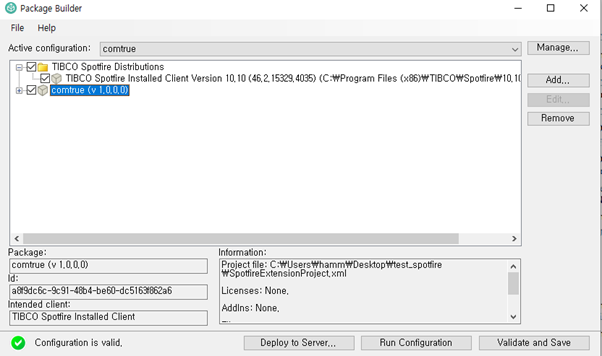
생성해준 파일을 선택하고 → File → Build Package File 을 클릭하여 spk 파일로 내보내 줍니다.
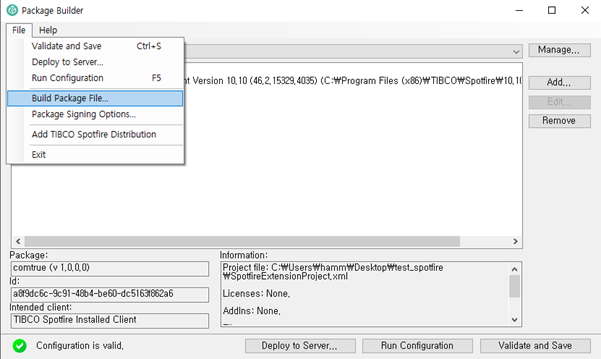
여기서 Build package File이 활성화가 안되면
저렇게 파일을 내보내 주면, .spk형태로 생성됩니다.
11. Spotfire 서버 접속
spotfire 서버에 접속해 줍니다
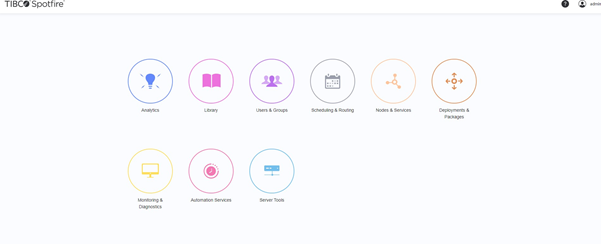
Deployment & Packages 를 클릭해줍니다.
11. new area 생성
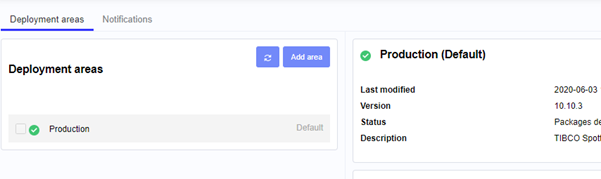
Add area를 클릭해 줍니다.
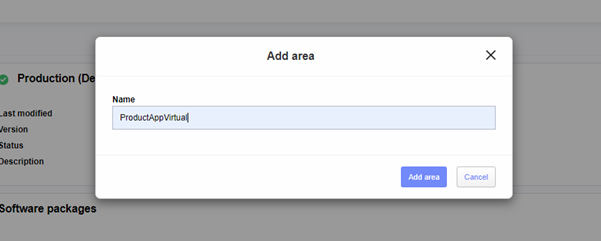
이름을 정해 새로운 area 를 생성해줍니다.
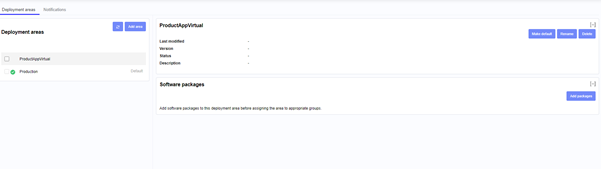
새로 생성된 area에 들어있는 것이 없는 것을 확인해 줍니다
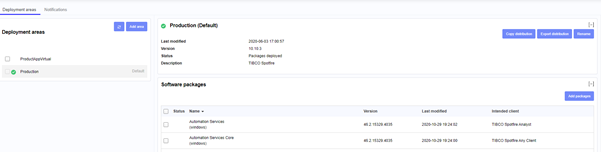
Default area인 Production에 접속하여 Copy distribution를 클릭해줍니다.
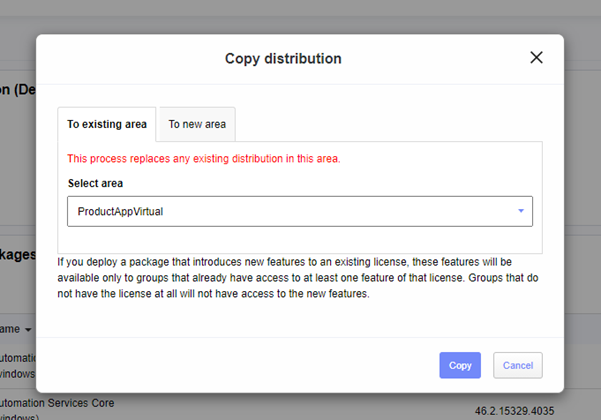
새로 생성한 area에 copy해 줍니다.
12. spk파일 배포하기
Add packages를 클릭해 줍니다.

생성한 파일을 넣어줍니다.
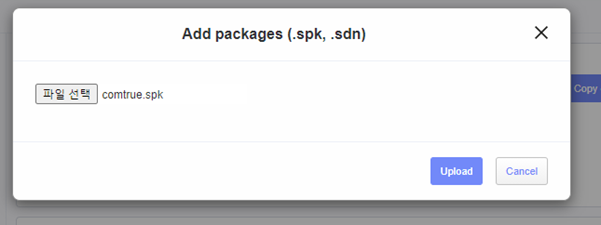

성공적으로 추가된 것을 확인해줍니다

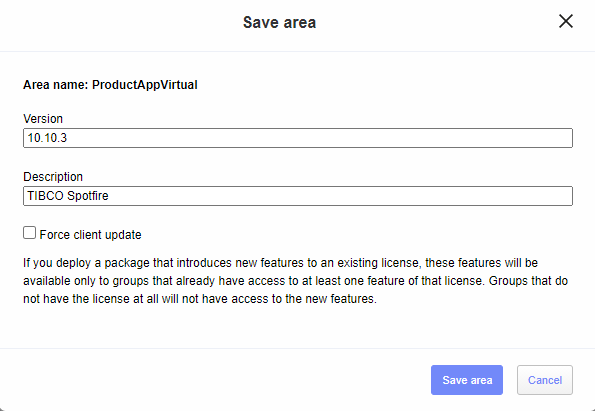
전체 선택을 해준 다음에 Save area를 눌러 현재 환경을 저장해 줍니다.
13. spotfire analyst에 접속해 줍니다.
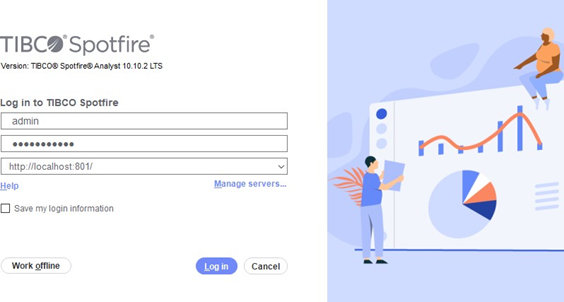
아이디/비번 입력하고 로그인 해줍니다.
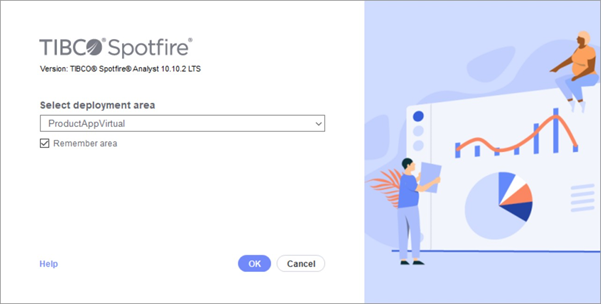
새로 생성한 area를 클릭하여 접속해 줍니다.
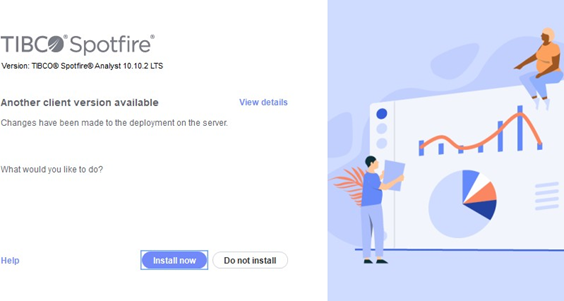
Install now를 눌러 필요한 부분들을 설치해 줍니다
.spk로 새로 패키지를 업데이트해줍니다!
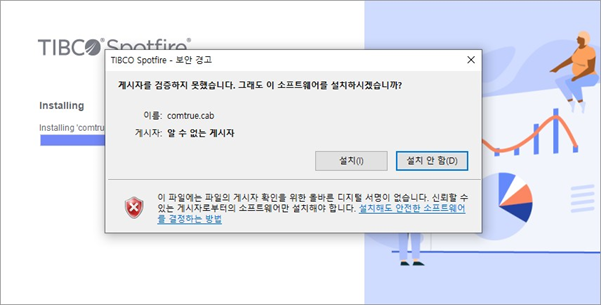
설치를 눌러 줍니다.
설치 진행 후에, 접속하여 주면 완료됩니다~!~!~!
'언어|프로그램 메모장 > spotfire' 카테고리의 다른 글
| spotfire server 설치하기 -(2) (3) | 2021.03.04 |
|---|---|
| spotfire server 설치하기 -(1) (2) | 2021.03.04 |
| spotfire public url 설정하기! (0) | 2021.02.18 |
| spotfire column 분할 (0) | 2021.02.17 |
| spotfire 텍스트 함수 (0) | 2021.02.17 |


댓글